导语:
1998年,Lecun等人在论文Gradient-Based Learning Applied to Document Recognition 里第一次定义了CNN网络结构,该网络被称为LeNet,成为CNN的开山鼻祖。
该模型有1个输入层,2个卷积层,2个池化层,2个全连接层,1个输出层。此处所使用的的数据集,即是Lecun当年用到的数据集,MNIST。
这里有一个手写数字识别的可视化网站 ,借助它能直观地分析LeNet运行的过程。
另附:卷积网络的可视化解释
本系列承接自之前的《神经网络编程——使用PyTorch进行深度学习》两篇博客 ,在掌握pytorch的基本语法之后,逐步复现目前的一些骨架网络。
卷积
可参考我之前写的计算机视觉(北邮鲁鹏)学习笔记(一) 中的卷积部分。
每个卷积层可以有多个kernel,卷积的目的是为了提取图像的特征 ,什么叫特征?边缘、形状、纹理等多种多样,根据kernel设置的不同可以得到不同的特征。图像经过卷积后的输出,叫特征图(Feature Maps) 。
特征图
池化
池化或子采样层通常紧跟在CNN中的卷积层之后。
池化操作通常也叫做子采样(Subsampling)或降采样、下采样(Downsampling) (不是瞎采样啊喂),保留最重要部分并丢弃其余部分,主要是为了减少过拟合率,由于池化后的图变得更小,也加快了计算速度。
常用的池化操作:
其他池化操作:卷积神经网络中的各种池化操作
池化
//TODO
像素计算
假设输入层是32 × 32 = 1024 32 \times 32 = 1024 32 × 32 = 1024 kernel,大小为5 × 5 5 \times 5 5 × 5 6 × 28 × 28 = 4704 6 \times 28 \times 28 = 4704 6 × 28 × 28 = 4704
池化的kernel大小为2,步长为2,则对卷积之后的6个特征图进行池化,总像素为6 × 14 × 14 = 1176 6 \times 14 \times 14 = 1176 6 × 14 × 14 = 1176
第二层卷积,有16个kernel,大小为5 × 5 5 \times 5 5 × 5 16 × 10 × 10 = 1600 16 \times 10 \times 10 = 1600 16 × 10 × 10 = 1600
第二层池化,kernel大小为2,步长为2,总像素为16 × 5 × 5 = 400 16 \times 5 \times 5 = 400 16 × 5 × 5 = 400
使用PyTorch复现该网络
先来搭建一下网络的结构
1
2
3
4
5
6
7
8
9
10
11
12
13
14
15
16
17
18
19
20
21
22
23
24
25
26
27
28
29
30
31
32
33
34
35
36
37
38
import torchimport torch.optim as optimimport torchvisionimport torch.nn as nnfrom torch.nn import functional as Fimport torch.utils.dataimport torchvision.transforms as transformsclass LeNet (nn.Module): def __init__ (self ): super (LeNet, self ).__init__() self .conv1 = nn.Conv2d(in_channels=1 , out_channels=6 , kernel_size=5 , padding=2 ) self .conv2 = nn.Conv2d(in_channels=6 , out_channels=16 , kernel_size=5 ) self .fc1 = nn.Linear(in_features=16 * 5 * 5 , out_features=120 ) self .fc2 = nn.Linear(in_features=120 , out_features=84 ) self .out = nn.Linear(in_features=84 , out_features=10 ) def forward (self, t ): t = F.relu(self .conv1(t)) t = F.max_pool2d(t, kernel_size=2 , stride=2 ) t = F.relu(self .conv2(t)) t = F.max_pool2d(t, kernel_size=2 , stride=2 ) t = t.view(-1 , num_flat_features(t)) t = F.relu(self .fc1(t)) t = F.relu(self .fc2(t)) t = self .out(t) return t def num_flat_features (t ): size = t.size()[1 :] num_features = 1 for s in size: num_features *= s return num_features
值得一提的是,MNIST“手写数字”数据集已经被FashionMNIST替代了,详见Fashion-MNIST
它长这样:
FashionMNIST 的大小、格式和训练集/测试集划分与原始的 MNIST 完全一致 。60000/10000 的训练测试数据划分,28x28 的灰度图片。你可以直接用它来测试你的机器学习和深度学习算法性能,且不需要改动任何的代码。
PyTorch已经内置了获取该数据集的方法。
1
2
3
4
5
6
7
8
9
10
train_set = torchvision.datasets.FashionMNIST( root='./data/' , train=True , download=True , transform=transforms.Compose([ transforms.ToTensor() ]) ) train_loader = torch.utils.data.DataLoader(train_set, batch_size=100 )
训练模型
1
2
3
4
5
6
7
8
9
10
11
12
13
14
15
16
17
18
19
20
21
22
23
24
25
26
27
28
29
30
31
32
33
34
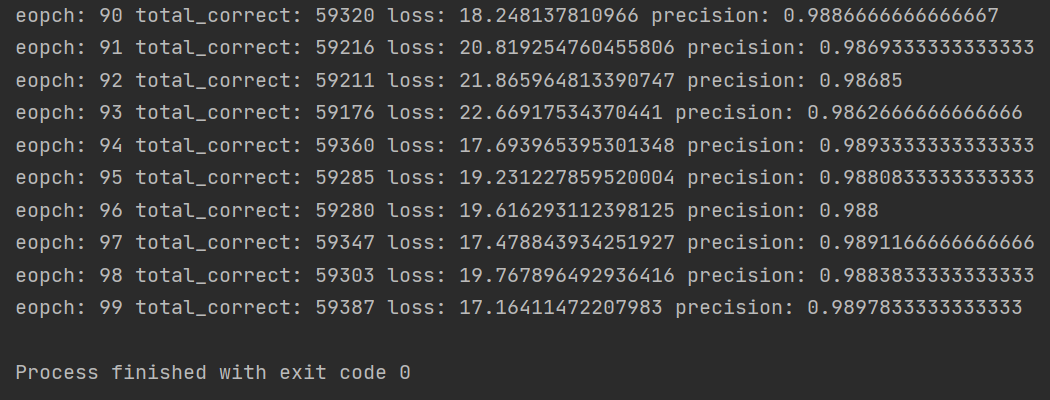
use_gpu = torch.cuda.is_available() le_net = LeNet() if use_gpu: le_net = le_net.cuda() print ('USE GPU' ) else : print ('USE CPU' ) optimizer = optim.Adam(le_net.parameters(), lr=0.001 ) def get_num_correct (preds, labels ): return preds.argmax(dim=1 ).eq(labels).int ().sum ().item() for epoch in range (100 ): total_loss = 0 total_correct = 0 for batch in train_loader: images, labels = batch if use_gpu: images, labels = images.cuda(), labels.cuda() preds = le_net(images) loss = F.cross_entropy(preds, labels) optimizer.zero_grad() loss.backward() optimizer.step() total_loss += loss.item() total_correct += get_num_correct(preds, labels) print ('epoch:' , epoch, "total_correct:" , total_correct, "loss:" , total_loss, 'precision:' , total_correct / len (train_set))
结果 


